Table of Contents
ToggleFinal Fantasy cosplay has become one of the most celebrated corners of the convention circuit, and for good reason. The franchise’s sprawling cast of unforgettable characters, from Cloud Strife’s spiky hair to Yuna’s elegant summoner garb, gives cosplayers a virtually endless well of inspiration. Whether you’re attending your first anime convention or you’re a seasoned costume veteran, crafting a Final Fantasy character can feel daunting. This guide breaks down everything you need to know to bring these iconic figures to life, from picking your character and sourcing materials all the way through photography and community engagement. We’ll cover the practical side of costume construction, styling tricks that actually work, and how to connect with other enthusiasts who share your passion for the series.
Key Takeaways
- Final Fantasy cosplay dominates conventions because the franchise offers distinctive character designs, instant visual recognition, and accessibility across all skill levels, from beginner to advanced crafters.
- Choose beginner-friendly characters like Aerith or Squall if you’re new to cosplay, and progressively tackle more complex builds like Cloud or Noctis as your sewing and foam-crafting skills improve.
- Source materials strategically using thrift stores, end-of-season fabric sales, and hardware stores for EVA foam—quality Final Fantasy cosplay doesn’t require a $1,000 budget when you prioritize smart sourcing over spending.
- Accuracy comes from detailed reference research using in-game models and official artwork, precise color matching, weathered prop details, and clean fabric finishing that separates impressive costumes from competition-winning ones.
- Practice character-specific poses before the convention, seek natural lighting and outdoor photo spots, and engage authentically with the online cosplay community through Instagram, TikTok, and Discord to build lasting friendships and collaborations.
- The Final Fantasy cosplay community thrives on mutual support—debut your costume confidently knowing that fellow cosplayers and fans will celebrate your work and welcome you regardless of your experience level.
Understanding Final Fantasy Cosplay Culture
Why Final Fantasy Costumes Dominate the Cosplay Community
Final Fantasy characters consistently rank among the most cosplayed figures at conventions worldwide. Part of this appeal stems from the franchise’s 30+ year legacy and the sheer visual variety across titles. Unlike some game franchises that rely on similar character archetypes, Final Fantasy offers distinct silhouettes, color palettes, and costume details that translate beautifully to real-world construction.
The characters are also instantly recognizable to both casual and hardcore fans. When someone spots a Tifa cosplay, they know exactly who it is. This recognition builds confidence for cosplayers, your work gets appreciated immediately, and other fans often approach for photos and conversations. Also, the designs themselves are crafted by world-class character artists, meaning the source material is already incredibly detailed and photo-worthy.
Another factor: accessibility across skill levels. A beginner can throw together a serviceable Aerith costume with relatively basic sewing skills, while advanced cosplayers can sink hundreds of hours into a screen-accurate Noctis outfit with LED-embedded armor pieces. The franchise supports both approaches.
Popular Events and Conventions for Final Fantasy Cosplayers
If you’re serious about debuting your Final Fantasy cosplay, timing and venue matter. Anime Expo in Los Angeles is historically the largest anime convention in North America, and Final Fantasy representation is massive every July. Halls overflow with cosplayers, and the outdoor photo zones provide ideal natural lighting for costume photography.
PAX West (Seattle, Labor Day weekend) attracts competitive cosplay divisions. If you’re crafting something tournament-grade, PAX’s structured cosplay competitions offer judging, cash prizes, and visibility among hardcore gaming audiences. Katsucon (National Harbor, Maryland, February) draws cosplayers specifically for its stunning outdoor venues and waterfront backdrops, perfect if your Final Fantasy costume needs dramatic photo opportunities.
Regional conventions matter too. Mid-tier cons like Anime Boston, Otakon, and Fanime Con have strong Final Fantasy communities where you’ll find dedicated meetup groups organized on social media beforehand. These smaller (relatively speaking) conventions are often friendlier for first-time cosplayers because competition feels less fierce and feedback is more constructive.
International events like Japan Expo (Paris) and Costume Con (various US locations) also attract serious Final Fantasy cosplayers. Research your local convention calendar and look for events with strong gaming communities and established cosplay tracks.
Choosing Your Final Fantasy Character
Most Popular Characters for Cosplay
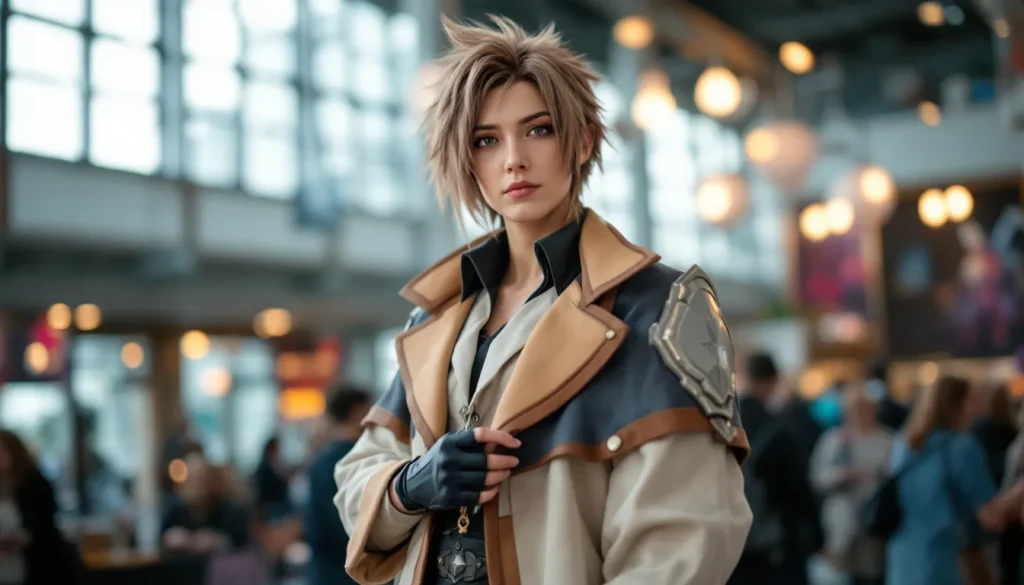
Certain characters dominate convention floors for reasons that extend beyond fan popularity. Cloud Strife remains a perennial favorite, his Midgar outfit is iconic, his codpiece is instantly recognizable, and his Buster Sword becomes a statement prop. Aerith Gainsborough’s white dress and flower basket appear constantly because the silhouette is simple but unmistakable. Tifa Lockhart’s combat outfit hits the sweet spot between distinctive and relatively straightforward to construct.
From Final Fantasy X, Yuna’s three outfit variations give cosplayers options. Her summoner dress is ornate but achievable: her Songstress costume is flashier and lets advanced crafters shine: her standard black outfit appeals to those wanting something sleeker. Rikku’s high-contrast blue and yellow palette makes the costume pop in photos even from a distance.
More recent entries expand the roster. Final Fantasy VII Remake versions of characters offer updated designs, Barret’s gun-arm is a wild build challenge but incredibly rewarding. Final Fantasy XV’s ensemble cast means Noctis, Gladiolus, Prompto, and Ignis all appear at cons, especially if groups coordinate matching outfits.
Why these characters specifically? Visual clarity matters. Intricate designs that look amazing in 4K in-game can become muddy or unclear at convention distances. Strong color contrast, clear silhouettes, and defined details (belts, weapons, accessories) translate better to a convention floor.
Beginner-Friendly vs. Advanced Character Options
If you’re new to cosplay, avoid characters with heavy armor pieces, complex LED work, or designs requiring advanced seamstress skills. Beginner-friendly options include: basic dresses like Aerith’s iconic pink gown, simple tunic-and-pants combinations, or straightforward jackets like Squall’s leather coat. These require basic sewing and focus more on styling (makeup, wigs, accessories) than structural complexity.
Intermediate characters demand more. Final Fantasy X-2 Yuna’s Songstress costume involves fitted panels, asymmetrical construction, and multiple layers. Cloud’s outfit requires tailoring his jacket, creating his pauldrons from foam or craft materials, and assembling the Buster Sword prop. Expect 40-60 hours of construction and some problem-solving.
Advanced builds are for experienced crafters. Final Fantasy XIV raiders who commit to high-end armor pieces might construct a warrior’s full plated outfit, requiring foam armor techniques, understanding of weight distribution, and wearability engineering. Noctis’s intricate jacket with multiple textures and technical layering, or a screen-accurate Kefka with hand-carved or custom-molded pieces, demand serious skill.
Honest assessment of your current abilities saves frustration. If you’ve never sewn before, don’t pick a character requiring invisible seams and fitted boning. Start with something forgiving, build skills, then level up. A well-executed beginner costume beats a half-finished advanced one every time.
Essential Materials and Tools for Costume Construction
Fabric Selection and Sourcing
Getting your material right is half the battle. For clothing components like dresses, cloaks, and jackets, woven fabrics work best. Cotton blends hold their shape well, don’t stretch unexpectedly, and are easy to tailor. Linen provides weight and structure, ideal for Strife-style coats. Twill (heavier woven cotton) works great for pants and structured pieces. Polyester taffeta or duchess satin gives Final Fantasy’s more formal characters the right sheen and body.
Avoid thin, stretchy knits unless the character specifically needs something clingy. Cheap jersey cotton creases badly and photographs poorly under convention lighting. If your budget is tight, thrift stores often have damaged or outdated formal wear you can harvest for decent-quality fabric. A $15 old bridesmaid dress might yield enough material for a costume piece.
Color matching is critical. Use in-game screenshots and official artwork as references. Many fabric stores let you bring phone photos to the cutting counter. Don’t settle for “close enough”, a noticeably wrong shade undermines an otherwise solid costume. Spend the extra 10 minutes finding the right tone.
Sourcing: JoAnn Fabrics remains reliable for most materials and regular sales. Etsy has specialty vendors selling cosplay-specific fabrics like holographic materials, faux leather, and metallic blends. Amazon offers bulk fabric rolls if you’re not picky. International retailers like MercadoLibre (Latin America) or AliExpress have budget options but expect 3-4 week shipping. For premium fabrics, Mood Fabrics (NYC-based but ships nationally) caters specifically to costume makers.
Props, Armor, and Accessory Materials
Weapons and armor need materials that look good, photograph well, and won’t actually hurt anyone. EVA foam (the stuff used for floor mats and interlocking gym tiles) is the standard. It’s lightweight, carves easily with a heat gun, glues well, and can be sealed and painted to look metallic. A basic Buster Sword can be carved from foam, sealed with Plasti Dip, painted, and weathered for realism, all for under $30.
Worbla (thermoplastic sheets) creates armor pieces with more precision than foam. You heat it, shape it over molds, and it holds detail beautifully. More expensive ($2-3 per square foot), but the results look more polished. Kefka’s collar, Noctis’s pauldrons, or Tifa’s breastplate work well in Worbla.
Fiberglass resin and casting resin let you create molds for identical pieces (useful if multiple people are cosplaying the same character group). Requires ventilation and safety precautions but produces extremely durable props.
For smaller accessories, belts, buckles, chocobo feathers, crystal necklaces, consider:
- Craft foam and craft paint for lightweight, affordable pieces
- 3D printing (through services like Shapeways or local print labs) for intricate accessories
- Polymer clay (Sculpey, Fimo) hand-sculpted and baked
- Resin casting kits from brands like Smooth-On for duplicating small details
Where to source: Cosplay-specific retailers dominate communities discussing tips and techniques like TNT Cosplay Supply and Ionic Adhesive. For raw materials, Home Depot and Lowe’s stock foam, resin, and sealants at better prices than specialty shops. Nexus Mods communities often share material recommendations in their gaming cosplay sections. Don’t overlook hardware stores for surprising finds, EVA interlocking tiles, duct tape, spray paint, and sealants are all cheaper there than at craft stores.
Step-by-Step Costume Building Techniques
Pattern Research and Modifications
Before cutting a single piece of fabric, research the character’s actual construction. This means going beyond cosplay photos, look at the original in-game model from multiple angles, find official art assets, and study how the pieces actually fit together.
If the character wears a jacket, identify: Where does it close? Are there visible seams? Does it have shoulder padding or structured sleeves? What about the collar, is it standing or lying flat? These details determine which sewing pattern base you start with. A simple button-up shirt pattern might work for a military jacket: a princess pattern becomes a ball gown.
You have three pattern options:
-
Commercial patterns (Simplicity, McCall’s, Vogue) cover most standard garment types. You won’t find “Cloud’s Final Fantasy VII jacket,” but you’ll find a structured coat pattern you modify. Many cosplayers size up from their usual size to accommodate armor and movement.
-
Free online resources like TheCospeyShop and Cosplay Sewing Academy provide Final Fantasy-specific patterns that fans have drafted and shared. Quality varies, so read reviews. Some are trace-and-go ready: others need serious modification.
-
Drafting your own using body measurements and reference photos. Intermediate-to-advanced skill. YouTube has solid pattern-drafting tutorials if you want to learn.
Modification is where most cosplay happens. That commercial jacket pattern becomes Cloud’s coat by: narrowing the sleeves, adding panel seams, extending the length, adjusting the collar shape, and adding specific hardware. Take detailed notes as you modify so you can explain your choices later (judges and photo-hungry fans appreciate the thought behind changes).
Sewing, Armor Crafting, and Assembly Methods
Once you have a pattern, construction begins. Basic sewing involves cutting, pinning, and stitching. Use a machine for speed on long seams: hand-sew details and closures for control. Invest in decent thread, cheap thread breaks, frays, and photos poorly. Match thread color to fabric or go slightly darker: lighter thread is visually jarring.
Key techniques that make a difference:
- French seams: Sewing, trimming, then sewing again so no raw edges show inside. Looks professional and lasts through multiple wearings.
- Topstitching: A visible line of stitching parallel to a seam. Creates definition and prevents edge curling in photos.
- Interfacing: Stabilizing fabric inserted between layers (collar, cuffs, hems) so they hold crisp lines. Essential for costume details.
- Pressing as you go: Most cosplayers skip this. Don’t. A well-pressed costume looks polished: wrinkled fabric reads as unfinished.
For armor and props, the basic progression is: design → material prep → rough shape → detail carving/molding → sealing → priming → painting → weathering/finishing.
EVA foam workflow: sketch design → print full-size template → glue template to foam → cut with hot knife or rotary cutter → heat gun-bend curves → glue pieces together → seal with Plasti Dip or Mod Podge → prime → paint → weather with dry brushing and washes.
Assembly is the final phase. How does armor attach to the costume? Snaps? Velcro? Magnets? Test wearability before the convention. Walk around your house, sit, raise your arms, crouch. Adjust attachment points if pieces shift. The best-looking costume is worthless if it restricts movement or falls off during a panel or photo op.
Achieving Authentic Character Accuracy
Researching Official Artwork and In-Game Models
Accuracy separates impressive costumes from impressive accurate costumes. Start by gathering the source material, in-game model screenshots at 4K resolution if the game supports it, official artwork from character design books, and concept sketches if available.
Final Fantasy VII Remake’s character models are incredibly detailed, use them as your reference standard for modern cosplays. Final Fantasy X’s official guides include front, side, and back views of major characters. Final Fantasy IV, V, and VI are older, so in-game sprites are lower resolution: here, official art books become critical. Many are available digitally through Final Fantasy’s design legacy featured in major gaming media or as reprints on bookstore shelves.
Document details in a reference binder or digital folder. Photograph specific elements: buckle placement, seam lines, color transitions, accessory sizes, and material type (does that look like leather, plastic, or cloth?). Ask yourself if a detail would be visible at convention distance. A tiny detail on a character’s thigh might be invisible at 10 feet away: prioritize visible elements when time is tight.
Final Fantasy characters often wear multiple outfit variations. Yuna has four canonical outfits: Cloud has Midgar, Nibelheim flashback, and postgame versions. Choose one and commit fully rather than mixing versions. Cosplay judges notice inconsistency, and fans prefer clear intent over confused amalgamations.
Color Matching and Detail Work
Color matching can make or break accuracy. A perfect Tifa silhouette with slightly-wrong blue on her shorts reads immediately as “off.” Use tools: phone color-picker apps, paint swatches from a hardware store, or fabric-specific matching at JoAnn’s. Consider lighting, convention hall LED lights are different from daylight. Bring your assembled pieces to a well-lit area (ideally near a window) to verify colors before you finish.
Some Final Fantasy characters wear iridescent or gradient colors that photo differently depending on angle and light. Yuna’s dress has subtle color shifts. Experiment with fabrics that catch light, matte vs. shiny, solid vs. patterned. A matte blue might match the in-game color better, but a subtle sheen photographs more dynamically.
Detail work separates good from great. This means:
- Armor edges: Don’t leave them flat. Angle them slightly, add bevels, weather the paint so metal looks used rather than factory-fresh.
- Fabric finishing: Raw edges should be hemmed or finished, not fraying. Seams should be clean.
- Hardware accuracy: If a character’s belt buckle is octagonal with specific proportions, make it octagonal. Generic square buckles undermine detailed work.
- Layering: Final Fantasy characters wear complex outfits. A vest over a shirt over an undershirt creates visual depth. Layer correctly to achieve that dimensional look.
- Weathering: Scuffs, scratches, and wear on props make them look real, not like fresh plastic. A matte overcoat with strategic dry brushing of darker paint ages a Buster Sword or armor piece significantly.
Time management: perfecting every tiny detail is impossible. Focus on visible, scale-appropriate details first. A character’s face and hands are the first things viewers see, your makeup and gloves matter more than the inside seam of a hidden pocket.
Makeup and Wig Styling for Final Fantasy Characters
Character-Specific Makeup Techniques
Final Fantasy characters have distinctive facial features that makeup can enhance or establish. Some characters need dramatic makeup: others need subtle enhancement of natural features.
Aerith’s look is relatively minimal, light foundation, defined eyes with soft browns and golds, and a subtle pink lip. The wig does 70% of the work: makeup just needs to complement the overall softness. Cloud’s makeup is heavier: defined cheekbones (contour), winged eyeliner or heavy eyeshadow to emphasize his angular face, and a sharper lip line. Kefka needs theatrical makeup, white base, dark exaggerated eye sockets, possibly face paint over the cheekbones. Yuna’s makeup should be elegant with emphasis on eyes: her gold accents in her hair mean coordinating warm eyeshadow tones.
Technical steps:
- Primer: Skip this and makeup fades by hour two. A tacky base prevents smudging through a six-hour convention day.
- Foundation: Match your skin tone exactly. Mismatched foundation ages a costume instantly. Blend to your jawline and neck.
- Contouring: Subtle for most Final Fantasy characters. Emphasize your natural bone structure rather than completely redefining your face.
- Eyes: This is where character identity happens. Shadows, liners, and emphasis should match the character’s in-game expression. Aerith wears soft, open eyes: Cloud’s gaze is sharper.
- Lips: Color should complement the costume. A bright lip might work for Tifa: a deeper, cooler tone suits Yuna better.
- Setting spray: Seriously, this is the difference between looking polished at hour one and melted by hour three.
Wig Selection, Styling, and Customization
The wig is arguably more important than makeup. A perfect wig carries a weak costume: a perfect costume with a bad wig collapses. Invest in wig quality. Cheap synthetic wigs look plastic-y, tangle immediately, and photograph terribly. Mid-range wigs ($25-50) from brands like Arda Wigs or Epic Cosplay work well: premium human-hair wigs ($100+) are ideal if budget allows.
Color matching matters enormously. Cloud’s wig must be yellow-blonde, not orange or platinum. Aerith’s brown must be warm, not cool-toned. Many wig retailers offer color samples, request them before ordering. Photos on websites often have incorrect color rendition due to lighting.
Styling transforms a generic wig into a character-specific one:
- Teasing/backcombing: Creates volume and texture. Cloud’s spiky style requires serious teasing at the crown and strategic backcombing of the front section.
- Heat styling: Synthetic wigs have memory: you can style them with a straightener or curler, release the heat, and they hold the style. Test on a wig sample first, some synthetic fibers melt.
- Cutting and trimming: Many cosplayers trim wigs to match character length. Do this carefully or take it to someone experienced. An uneven cut ruins the whole look.
- Adding hair falls or extensions: If a character’s hair is longer or fuller than your base wig, add sections. This requires basic sewing or clip-in knowledge.
- Accessories: Clips, bands, beads, or ornaments styled into the wig create character-specific details. Yuna’s hair accessories are essential to her look: Tifa’s hair ties must be the right color and positioned correctly.
Convention day care: Bring wig supplies, hairspray, bobby pins, and a small brush. Touch-ups happen constantly, especially if you’re posing for photos. Don’t sweat in a wig for six hours without ventilation: take breaks and let your scalp breathe or you’ll develop a headache.
Budget-Friendly Cosplay Tips and Hacks
Cost-Effective Material Alternatives
A quality Final Fantasy cosplay doesn’t require a $1,000 budget, though some ambitious builders spend that and more. Smart sourcing cuts costs significantly.
Fabric shopping hacks: Thrift stores yield surprising finds. A $3 men’s dress shirt becomes Aerith’s white undershirt: a broken bridesmaid dress yields yards of decent satin. End-of-season clearance at fabric stores (JoAnn’s especially) marks down remaining stock 50-75%. End rolls of bolt fabric sell at steep discounts. Watch for “Fabric Tuesday” sales at local shops.
Foam armor alternatives: EVA foam is cheap, but craft foam sheets (dollar stores, even) work for smaller, less-detailed pieces. Papier-mâché over carved foam creates lighter props than solid foam. Worbla is expensive, cardboard wrapped in duct tape and painted creates surprisingly solid-looking armor for pieces that don’t take impact.
Wig savings: Arda Wigs and Epic Cosplay run sales frequently: sign up for email lists. Last year’s Halloween wigs in wig shops get marked down hard post-October. You might find close color matches at different base styles, saving $20+. Some cosplayers buy wigs, share shipping costs by ordering together, splitting prices.
Prop materials: Home Depot foam insulation cost $8-12 per sheet and carves beautifully. PVC pipes and fittings become staff frames. Basketball or kickball cores become great bases for round props (Yuna’s staff, summoning crystal effects). Dollar store finds repurposed into costume pieces, plastic items, fake jewelry, decorative elements, appear constantly in budget cosplay.
Shared resources: Many cities have community makerspaces with laser cutters, 3D printers, and sewing machines. Monthly memberships ($20-50) let you access tools you’d never buy individually. Split access with a friend and it’s incredibly cheap.
Repurposing and DIY Solutions
The most experienced cosplayers repurpose constantly. Old prom dresses become costume bases. Men’s dress pants become armor underlayers. Leather jackets from thrift stores become props or costume elements.
DIY solutions that work:
- Modifying commercial clothing: Buy a basic black jacket, add panels, remove sleeves, dye it slightly darker. Becomes Cloud’s coat for 70% less than building from scratch.
- Extending garment life through dyeing: That white fabric you have is too pale? Dye it darker or add color tone. Fiber dyes cost $5-10 and transform materials.
- Using adhesives instead of sewing: Fabric glue bonds pieces without stitching (useful for armor or backing). Velcro attaches pieces removably (armor to undersuit). Not as durable as sewing long-term, but perfect for convention-only pieces.
- Painting over existing fabric: A cheap basic garment dyed or painted to match character colors becomes functional quickly.
- Kitbashing props: Combining multiple cheap pieces (plastic toys, hardware, 3D printed parts) into a single custom prop. That $2 plastic sword plus $5 of foam plus $3 of paint becomes a $10 custom weapon prop vs. a $50+ commissioned piece.
Honestly, the difference between a $200 and $800 cosplay often isn’t visible in photos. Smart sourcing, strategic focus (perfect the visible elements, good-enough on hidden parts), and clever repurposing get you 90% of the way there for a fraction of the cost. Spend time, not just money. Research, brainstorm alternatives, and execute efficiently, that’s how budget cosplayers build amazing costumes.
Photography and Posing for Maximum Impact
Posing Techniques That Capture Character Essence
A great costume photographed badly loses impact. Posing matters enormously. Study how characters hold themselves in-game, promotional art, and cinematics.
Cloud’s iconic pose: hand resting near his Buster Sword, slightly defensive stance, gaze off to the side (not at the camera). Aerith is softer, open posture, often holding her staff or flower, gentle hand placement. Tifa’s a fighter, confident stance, hands ready, strong forward-facing presence. Yuna’s elegant, poised, balanced weight, gestures that suggest grace and summoning magic.
Base posing rules:
- Angle your body slightly relative to the camera (rarely stand straight-on unless the character does)
- Create depth by positioning one leg forward, creating line through your body
- Hand placement matters: resting on a weapon, gracefully at your sides, gesturing with intent
- Head angle and gaze contribute enormously to character reading, a sideways glance is different from direct eye contact is different from looking down pensively
- Dynamic poses (action poses, mid-jump, mid-cast) photograph more interestingly than static standing, but they’re harder to hold stable
Practice poses beforehand. Have a friend photograph you in the costume. Identify what works and what feels forced. Notice which angles are most flattering and which highlight details. By convention, you’ll have muscle memory and won’t need to think about posing.
Movement and transitions matter too. Don’t freeze in one pose for every photo. Transition between positions, walking, turning, adjusting your props. Photographers capture these moments and often the best shots come from transitional movements, not static poses.
Lighting, Backgrounds, and Photo Editing Basics
Convention lighting is often mediocre, fluorescent, harsh, inconsistent. Good cosplayers work around it or seek better spots. Indoor convention halls: Find spots near windows or exterior doors where natural light comes through. Avoid direct overhead fluorescents when possible. If you’re posing in an ugly hallway, use a white bedsheet or reflector as a backdrop and angle toward the light.
Outdoor shooting (many conventions have outdoor photo ops) is ideal. Position yourself with light hitting your face (avoid harsh shadows), with the sun behind slightly or to the side for dimension. Midday sun is harsh: golden hour (early morning, late afternoon) is magic for photography. Shoot near sunrise or before sunset for the best light.
Backgrounds either complement or distract. A blurry background (achieved with shallow depth of field on a real camera, or strategic framing) keeps attention on your costume. Convention photo ops often provide themed backdrops, use them. Outdoor ruins, water features, or architectural elements make compelling backdrops when they’re recognizable but not distracting.
Photo editing is expected in gaming/cosplay communities. This doesn’t mean heavy filters or unrecognizable manipulation, it means color correction, basic cleanup, and enhancement.
Simple edits that matter:
- Exposure/brightness: Conventions are dark: boost slightly to make details visible without washing out
- Contrast: Increases pop and definition
- Saturation: Slightly increased saturation makes colors more vivid without looking fake (important for accurate color representation)
- Clarity/sharpness: Subtle sharpening emphasizes detail
- Blemish removal: Dust, small stains, or temporary skin issues removed (not smoothing out texture entirely, keep it real)
- Color grading: Slight color cast adjustment if lighting was off-white
Use Lightroom, Snapseed, or even Photoshop’s auto-enhance as starting points. The goal is enhancement, not recreation. If someone told you they couldn’t recognize the photo as you, you’ve edited too much.
Connecting with the Cosplay Community
Online Communities and Social Media Strategies
Final Fantasy cosplay communities thrive online. Instagram is the primary platform, hashtags like #FinalFantasyCosplay, #FFVIICosplay, #FinalFantasyX, and game-specific tags connect you with thousands of cosplayers. Post quality photos with detailed captions explaining your build process. The algorithm favors engagement, so respond to comments and engage with other cosplayers’ content genuinely.
TikTok has exploded as a cosplay platform. Time-lapse costume construction videos, before/after transformations, and character lip-sync videos perform extremely well. Short-form content reaches younger audiences and sometimes goes viral, driving followers and convention meetups.
Reddit communities like r/cosplay and game-specific subreddits (r/FinalFantasy, r/FinalFantasyVII, etc.) welcome progress posts and finished costume photos. These communities provide constructive feedback from experienced cosplayers. Don’t just post and vanish, engage with the community by commenting on others’ work and answering questions.
Discord servers dedicated to Final Fantasy, cosplay, and convention planning are where real-time discussion happens. Search for convention-specific Discord servers (many Anime Expo or PAX attendees organize pre-convention meetups in Discord). These communities share tips, collaborate on group cosplays, and often schedule photo shoots together.
Facebook groups for regional conventions and cosplay communities still matter, especially for older cosplayers and organizers. Join your local area’s cosplay groups for leads on local conventions, material swap meets, and community events.
Collaborations and Networking at Events
Group cosplays, multiple people dressed as characters from the same game or storyline, create visually striking photos and are more fun than solo cosplaying. An ensemble of Final Fantasy VII characters (Cloud, Aerith, Tifa, Barret, and Red XIII) photographs better than individuals alone. Coordinate beforehand through Discord or group chats. Discuss which characters each person is doing, establish a photo schedule (when and where you’ll meet), and agree on timing for panels and convention exploration.
At conventions, actively network. When another cosplayer approaches for photos, have a genuine conversation. Ask about their build process, share your tips, exchange social media handles. These interactions become friendships and lead to future collaborations. Cosplayers become your convention buddy group.
Participate in cosplay competitions and panels if your confidence and costume quality support it. Competitions provide structure for feedback and visibility. Panels about cosplay (construction, materials, budgeting) are often hosted by more experienced cosplayers, watch them, ask questions afterward, and build relationships with panelists. They remember engaged audience members and often invite them to future projects.
Photography collaborations matter. Professional convention photographers and serious photography hobbyists scout the floor looking for impressive cosplays. If your costume is solid, photographers approach for official photos. Get their social media handles and ask them to tag you. Good photography dramatically increases visibility. Many photographers also run Instagram accounts with tens of thousands of followers, you might gain hundreds of new followers from a single professional shoot.
Convention social events, cosplay meetups, after-parties, or community dinners, are where friendships form. These are gold for networking. You meet cosplayers from other regions, learn about conventions elsewhere, and often find people interested in collaborating on future projects. Final Fantasy communities especially tend to be friendly and inclusive: don’t be shy about joining group meetups or inviting other cosplayers to grab food between panels.
The cosplay community thrives on mutual support and shared passion. Build genuine relationships, show appreciation for others’ work, share knowledge generously, and you’ll find yourself with a network of friends who support your passion and inspire your future costumes.
Conclusion
Building a Final Fantasy cosplay is a deeply rewarding project that bridges gaming passion with creative craft. From choosing a character that resonates with you through executing every detail with intention, the journey teaches practical skills, builds community connections, and produces something you’ll genuinely wear with pride. The best costume is the one you finish and actually wear to a convention, not the perfect costume that lives unfinished in your closet. Start realistic, build smart, focus your effort where it shows, and iterate. Your first Final Fantasy cosplay won’t be your last: each one teaches you something for the next.
The community is waiting. Final Fantasy cosplayers at conventions are universally enthusiastic about talking costumes, sharing techniques, and celebrating others’ work. Whether you debut at a local anime con or PAX, you’ll find your people. And when someone recognizes your character and stops you for a photo, when another cosplayer compliments your armor work or makeup execution, that moment reminds you why you spent those hours researching, sourcing, and crafting in the first place. It’s not about being perfect: it’s about bringing a character you love to life and sharing that passion with a community that gets it. Now get building.


